Saturday, December 10, 2011

Sunny weather

Blue skies and sunshine today, so I decided to go outside instead of hiding in the garage all day. So I went to the local sailing shop in Gdynia harbor to buy the hatches for the watertight compartments.


After the shopping I went for a short walk around the yacht harbor and the commercial harbor. In the picture below you can see one or our two local square riggers (the other one is more beautiful but I could not get a good angle on that one).


Despite blue skies and sunshine it was actually also very windy and only a few degrees above zero, so after a few more non boat related errands I head back to the garage.


The following was done today:
- Removing excess glue from the frames (especially the early once, before I realized that it is a good idea to wipe of the squeeze out), using a heat gun and a scraper.
- Fairing of the transom inserts
- Started to glue the stem
- Started coating the frames with epoxy
- Marked out the centre board casing sides


Time today: 3 h

Friday, December 9, 2011

Finalising frames

Even though clamp pile is growing I could use a few more, most of the time I am limited by not enough clamps.


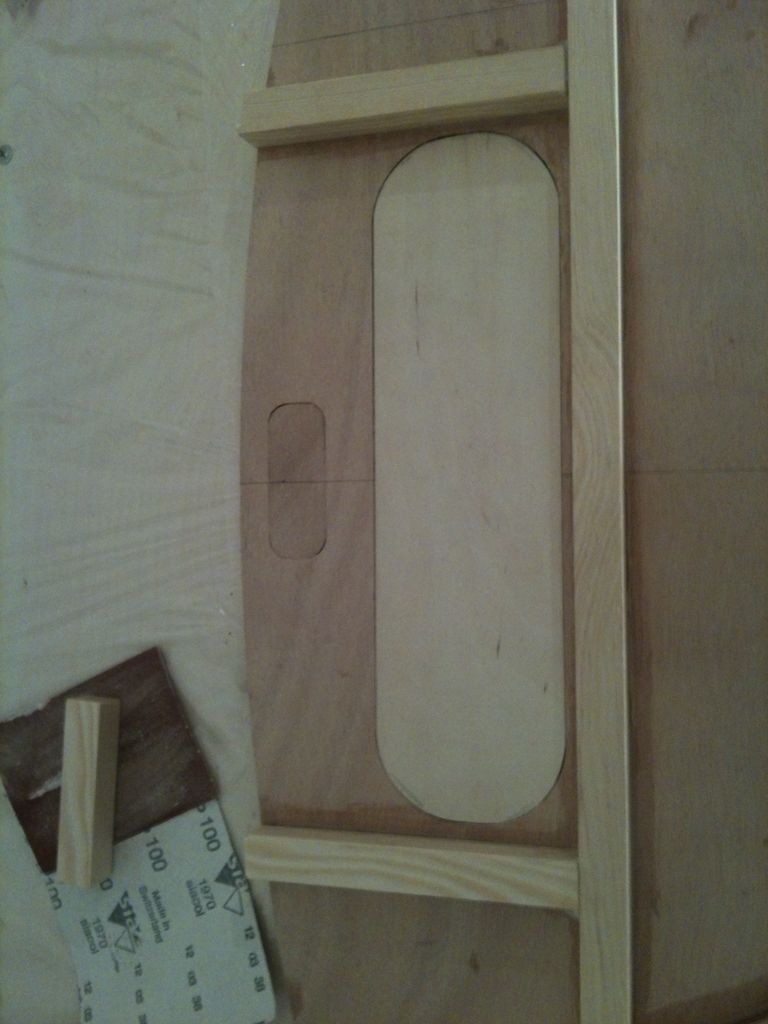
Today I did the final glueing of the frames, I also made the insert for the big transom cut-out (where the tiller lines is supposed to be). It was much trickier to get a good fit for the big insert. I made it by putting the transom on top of a 9mm ply sheet and traced the inside of the cut-out onto this. Then I cut it with my Japanese pull saw (excellent saw by the way) to the outside of the line. Then it was time for a lot of sand paper until I could fit it in (this is the tricky and boring part, to sand enough but not more...).

I hope the glueing will be successful, I have a 9mm ply piece on both sides and some stiffening timber in the hope that I will get a uniform pressure from both sides. 
Along the centre line of the transom I will fit a piece of wood that will cover the insert and strengthen my patch work, this is also what I will screw the rudder fittings to.

Tomorrow I will start with the centre board casing and maybe the bottom plate.

Time today: 2 h (Total 28 h)

Thursday, December 8, 2011

Continuing with frames

Today I continued to glue frames, #2 & 6 is done, started #3, 4 & 5, in addition to the transom.

The picture shows an overview of the garage today, I had to open the door to take it and it was really cold, they say the first snow will come this weekend.

I have also found a guy (through friends) that can make me stainless steel fittings such as the centre board pintle, rudder fittings etc. I just need to make some drawings. I also hope to order the sails before Christmas.

Time today: 2.5 h

Wednesday, December 7, 2011

Filler pieces

Not much time today so I made a small filler piece to close the boomkin opening in the transom. As you probably know I will use a different tiller arrangement so I will not need these openings. Will need to make a bigger one for the tiller cut out as well.

Time today: 15 min

Tuesday, December 6, 2011

Tool maintenance

I though perhaps it is boring to look at the same frames being glued day after day so today I did some tool maintenance, sharpening of my planes.
But first the daily glueing, #1 is finished, the last glueing for #2 and #6 was done today and I started the transom.

Before I could start sharpening I had to lap my water stone, i.e. make it flat (I have not done this in a while). This is done by sanding it against a flat surface, my kitchen bench is flat enough for my purposes. I use a 400 and a 1000 grit paper for the flattening.


My water stone is 4000/8000 grit so it is actually too fine for sharpening planes, I bought it a few years ago to sharpen my razor so when doing the planes I have to hone them a bit longer compared to if I had a coarser stone.


I gave the razor a sharpening as well in addition to the smoothing plane and the block plane.

Time today: 2 h (Total time 23 h)

Monday, December 5, 2011

Back to my frames

Back again to do more glueing on the frames, tomorrow I will flip them over to do the other side.
Today I also cut some doublers for the stringer cut-outs, did not bother to do the type that wraps the cut-out since the main purpose is to have some material to screw into while attaching the stringers. I made sure they are on a surface that will not be visible when the boat is finished.

Time today: 1 h

Thursday, December 1, 2011

Tiller arrangement

Will be busy with other things for a few days so not much will happen on the build until Monday. So I thought I might share a small change I will do to the boat. I have decided to fit her out with a push-pull tiller instead of the designed tiller (a "normal" tiller with rope connection to the rudder below the aft deck). There are several reasons for this. Firstly I like push-pull tillers, secondly I have had some problems finding the aluminium pipe needed to pivot the design tiller around. There are more but those two are the main reasons. This require me to do some structural changes as well.
- The mizzen need to be moved slightly
- The boomkin need to be relocated
- The rudder stock need to be modified by extending it upwards so the tiller can clear the aft deck
- Fit additional stiffening to support the new location of mizzen and boomkin.
Before anyone asks the change has been ok'ed by the designer.
Time today: 0 h