
Saturday, March 24, 2012
Friday, March 23, 2012

Thursday, March 22, 2012
Planking done!
Finalized the planking today!!!!
Did much of the same as the last few days.


.jpg)
I am extremely happy to be done with the planking, finally it feels like I am half way into the build. There will be no more boatbuilding until after Easter as I have other things to do, I will still post if I find something nautical that I think may be of interest.
Time today: 3h
Did much of the same as the last few days.

Prepared plank pieces for installation

Trimmed planks

Cutting the rabbet

Rabbet and landings done, time for glue
.jpg)
Planking finished!!!! Time for a whisky celebration! (The stem is actually much more vertical than it looks in the picture, must be something with the angle)
I am extremely happy to be done with the planking, finally it feels like I am half way into the build. There will be no more boatbuilding until after Easter as I have other things to do, I will still post if I find something nautical that I think may be of interest.
Time today: 3h
Wednesday, March 21, 2012
Port
Hung the last plank on the port side today. First I cut out all the pieces for both planks.


.jpg)
Time today: 4h

Planed the edges

Dry fitting

Drilled the screw holes and planed the scarfs

During planking
.jpg)
All done, starboard tomorrow!
Time today: 4h
Tuesday, March 20, 2012
Last pair of planks
Started the last pair of planks tonight. First I pulled the screws out of the starboard plank and trimmed it at the stem.

Then I started the last plank properly by cutting the rabbet on the port side.

I hung the last part of the spiling plank and started marking it up. From old habit I had marked the midpoint of the top stringer and spiled (fidded) the plank to this blue line but luckily I discovered my mistake in time.
.jpg)

Finally I marked out the plank pieces on the plywood.

Time today: 2.5h

Screws out, stem not trimmed yet
Then I started the last plank properly by cutting the rabbet on the port side.

Rabbet
I hung the last part of the spiling plank and started marking it up. From old habit I had marked the midpoint of the top stringer and spiled (fidded) the plank to this blue line but luckily I discovered my mistake in time.
.jpg)
Spiling plank in place

Redoing the marking correctly this time

The last pair of planks ready for cutting (three pieces each)
Time today: 2.5h
Sunday, March 18, 2012
The other side
My cold is back again, do not know how to get rid of it.....
Pulled the screws of the plank I glued yesterday, the scarfs came out fine.


Then I planked up the starboard side. This is when a strong back on wheels is very handy, I just moved it to the other side of the garage and had plenty of space to hang the plank.

Finally I started working on the port side again, planing the landing and hanging the spiling plank. I looked into my log today and it takes me around 12 hours to hang a pair of planks, from starting to plane the landing to the last piece is glued. The earlier planks was naturally slower and it will be interesting to see how fast I can do the last plank.


I cut myself quite badly today on my hand saw when trimming the plank at the transom. I was trying to hold the saw flush with the transom and my thumb got jammed between the saw and the plank. A lot of blood but nothing a band-aid could not cure.
Time today: 3.5h (Total time: 200h, if my estimate is correct I should be half way!?)
Pulled the screws of the plank I glued yesterday, the scarfs came out fine.

One of the scarfs

The other one from the inside

The first one after a little sanding
Then I planked up the starboard side. This is when a strong back on wheels is very handy, I just moved it to the other side of the garage and had plenty of space to hang the plank.

The other side
Finally I started working on the port side again, planing the landing and hanging the spiling plank. I looked into my log today and it takes me around 12 hours to hang a pair of planks, from starting to plane the landing to the last piece is glued. The earlier planks was naturally slower and it will be interesting to see how fast I can do the last plank.

Plank landing planed

Part of the spiling plank in place, the rest will have to wait until I have cut the rabbet at the stem.
Time today: 3.5h (Total time: 200h, if my estimate is correct I should be half way!?)
Saturday, March 17, 2012
The death of a saw
Continued the planking today.


As I was cutting the last piece the sabre saw started to get very hot, it made strange noises, small pieces of plastic fell out of it and it stopped cutting....... It served me well for almost ten years but now it is time for a replacement. So I had to do the final cut by hand.

Finally I glued the port side plank onto the boat, this time I did scarf joints but did the assembly on the boat instead of the bench. (Went very smoothly, let's see tomorrow how they came out)


Time today: 7h

Marked out the scarfs and the bulkhead locations

Cut the rabbet

Hung the spiling plank/template

Marked the pieces on the ply

Ready for cutting
As I was cutting the last piece the sabre saw started to get very hot, it made strange noises, small pieces of plastic fell out of it and it stopped cutting....... It served me well for almost ten years but now it is time for a replacement. So I had to do the final cut by hand.

R.I.P
Finally I glued the port side plank onto the boat, this time I did scarf joints but did the assembly on the boat instead of the bench. (Went very smoothly, let's see tomorrow how they came out)

Forward

and aft
Time today: 7h
Friday, March 16, 2012
Back to planking
Before I could start on the third plank I had to remove a screw that I broke close to the transom. I used a plug drill and a chisel to get to the screw and then a "wise grip" to get it out.


I also managed to get the broken screw in the bottom out, the one a the the butt block (Thanks for the tip Wayne!)
Then I marked up the plank landings and started to plane. I did all the planing with the smoothing plane this time no need to fiddle with the block plane.


Finally I filleted the bottom area of the aft buoyancy tank.

Time today: 2h

I broke the screw just below the ply surface, so I need to remove it before I start to plane the plank landing.

The area around the screw has been drilled out

I have chiseled away the wood plug

Screw is out

It looks bad but it will be covered by the next plank so I will just fill the hole with thickened epoxy
I also managed to get the broken screw in the bottom out, the one a the the butt block (Thanks for the tip Wayne!)
Then I marked up the plank landings and started to plane. I did all the planing with the smoothing plane this time no need to fiddle with the block plane.

Plank landings marked out

Here you can see that the next plank will cover my screw extraction hole

Plank landing planed
Finally I filleted the bottom area of the aft buoyancy tank.

Quite messy fillets, mainly because the plastic bag burst at the seams when I squeezed it.
Time today: 2h
Thursday, March 15, 2012
Fumes....
Unfortunately still too much solvents in the air to work in the garage today. So I decided to do some tool maintenance aka honing. But first I built a small angle setting jig for the honing guide.
It is simply a piece of ply with a straight edge, on top of this you glue blocks of wood at the correct distance to get the right angle with the honing guide.
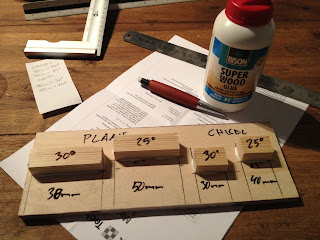

This way I will get the same angle every time I hone my blades and chisels, I should have built this one months ago......
Time today: 2h
It is simply a piece of ply with a straight edge, on top of this you glue blocks of wood at the correct distance to get the right angle with the honing guide.

Two blocks for plane blades and two blocks for chisels, one at 25 and one at 30degrees

To mount the blade in the guide you push the blade towards the correct block and the guide towards the edge of the plate and then tighten up the guide.
Time today: 2h
Wednesday, March 14, 2012
2nd coat
Applied the second coat in the seat tanks today.

I might need a third coat but that will have to wait a few days as I am keen to plank the rest of the boat.
Time today: 2h

I might need a third coat but that will have to wait a few days as I am keen to plank the rest of the boat.
Time today: 2h
Tuesday, March 13, 2012
First painting
Painting the seat compartments today, the first coat. The paint I am using is called "Sigmafast 205" and it is a "two component high build polyamide cured zinc phosphate epoxy primer/coating". I do not really know what that means but I got it at a good price. It turns out that the whole saler for Sigma coatings (I am familiar with them regarding ship coatings) have their office close to where I work and their prices is very close to that of the house paint you can buy in the big box shops (maybe 20-30% more than latex house paint)! So I decided to go for the "expensive" stuff.
It is a very nice paint to use flows easily without running, but it smells quite a bit.

There are two doors between the garage and the house so no smell outside of the basement luckily.

I also discovered some holes from my bench scarfing that I had not filled with epoxy. So tomorrow I will have to drill them out and stuff them with epoxy before the next coat of paint.

That could have been a fun launching day.....
Time today: 2h
It is a very nice paint to use flows easily without running, but it smells quite a bit.

Nice with a mask when you are dealing with the smelly stuff
There are two doors between the garage and the house so no smell outside of the basement luckily.

First coat done
I also discovered some holes from my bench scarfing that I had not filled with epoxy. So tomorrow I will have to drill them out and stuff them with epoxy before the next coat of paint.

Oops!
That could have been a fun launching day.....
Time today: 2h
Monday, March 12, 2012
Sanding
Did a little different jobs today.
Fitted the watertight hatches to the seat fronts.


Repaired a small mistake on the center board case


Finally I sanded, sanded and sanded the fillets from yesterday, I really hate sanding.....
Time today: 3h
Fitted the watertight hatches to the seat fronts.


I managed to cut the forward extension of the case both too short and too high

Since the case is straight and the stringer is curved I had to do a little 3D shaping of the filler pieces

All glued up
Time today: 3h
Subscribe to:
Posts (Atom)